The Intricacies of the Death Penalty Mechanism in Stardew Valley
Stardew Valley, the idyllic farming simulator, isn’t all about planting crops and befriending villagers. There are hazards in the mines, dangers lurking in the desert, and yes, the possibility of “dying.” While death in Stardew Valley doesn’t mean game over, it comes with its own set of penalties. This article aims to shed light on this often misunderstood aspect of the game.
Health and Energy Bar
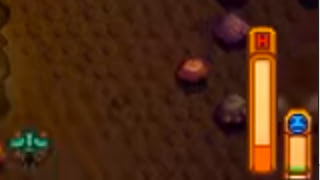
In the bottom-right corner of your game screen, you’ll find the Energy Bar, and to the left of it hides the Health Bar. This bar is usually hidden and only appears when you sustain damage or enter certain areas like mines or deserts. Initially, your Health Bar starts at 100 points.
Increasing Your Health Limit
Your health cap can increase in several ways:
- Leveling Up in Combat: For each combat level gained, except at levels 5 and 10, your maximum health increases by 5 points.
- Choosing Warrior Skill at Level 5: Grants an additional 15 health points.
- Choosing Defender Skill at Level 10: Adds another 25 points to your health.
- Completing Mr. Qi’s Desert Cave 100th-floor Quest: Rewards you with an extra 25 health points.
By using these methods, you can max out your health at 205 points.
Death Penalty vs Fainting Penalty
When your health or energy drops to zero, different penalties apply:
- Fainting: When your Energy Bar depletes, you faint and wake up in the closest bed, advancing the game to the next day. You’ll lose 10% of your held money, up to a maximum of 1,000g or 2,500g if you’re on Ginger Island.
- Death: When your Health Bar is empty, and you don’t have a Phoenix Ring, you “die.” You get rescued and recover 10 health points, but you’ll lose money and items.
Rescue and Financial Consequences
Depending on your location, different villagers may rescue you:
- Mines: Likely Linus or another friendly villager will bring you to the mine entrance.
- Town and Other Areas: You’ll wake up in Harvey’s clinic, paying a flat fee of 1,000g.
- Ginger Island: Rescued by Willy and Leo to the docks.
Your lost money ranges from 1/20 to 1/4 of your total gold. This loss isn’t influenced by daily luck but by luck-boosting items, reducing your money loss by up to 9%.
Mitigating Item Loss
Death comes with the penalty of losing items. A list appears, showcasing what you lost along with its total value. You can later redeem one item from Marlon.
Note: If you die again without redeeming, you won’t be able to redeem your previously lost items.
Key Considerations for Item Drop:
- Tools and rings, including the Galaxy Sword, will not drop.
- Items that can’t be thrown in the trash will not drop.
- Base drop rate is 25%, affected by daily luck ranging from -0.1 to +0.1, and other luck-boosting consumables.
Conclusions and Player Tips
While the idea of dying in Stardew Valley might seem dire, understanding the mechanics can help you mitigate the risks. Increasing your health, understanding the difference between fainting and dying, and knowing how to control item drop chances can go a long way in managing the so-called “Death Penalty” in the game.